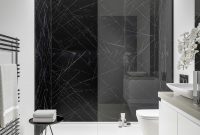
Cement Board Shower Wall
 Tile Installation Bath Tub Installation In Maitland Fl with regard to size 1632 X 1224
Cement Board Shower Wall – Designing and developing a glass block shower wall or window mustn’t be brain surgery – but you’ll find large choice of potential sizes and patterns to choose from that can increase the risk for task seem difficult. This article will provide specific tips and steps to ensure you get the correct size blocks for your job.
Design Tip # 1 – When to go with a 4″ x 8″ x 4″ block – Since this block may be the skinniest unit it can be used either to add a window opening in which a thin block should be used in order to develop a curved kitchen or recreation room bar. If you’re looking for a means to jazz up your selection consider sprinkling in certain frosted or colored glass blocks too. It is usually safer to attempt to prefabricated sections applying this block as they are hard to lay using the unit by unit method because of the fact they just don’t have much surface area for the 4″ side.
Design Tip # 2 – When to go with a 6″ x 6″ x 4″ block – This unit is frequently used by either new construction or replacement windows. It looks good when it’s paired in larger commercial openings using the 12″ x 12″ x 4″ sized masonry units. It is for sale in most of the common patterns including Decora, Wave, Argus, Vue, Clear and Iceberg patterns. This block is hard to use with partition walls because you’ll find no finishing end, corner or curved blocks that is included with 6″ sizes.
Design Tip # 3 – When to go with a 6″ x 8″ x 4″ block – This unit size is often a fantastic choice when you’re seeking to complete a shower stall or enclosure. The reason this block works out well is really because the curved glass blocks and most of the finished bull nose end units are manufactured within the 6″ x 8″ x 4″ size. Since this size is not too large it is packaged in handy when you’re created curved walk in shower wall and then there is not a large amount of depth for the shower base.
Design Tip # 4 – When to choose the 8″ x 8″ x 4″ block – The most cost effective block to create your shower, wall or window with may be the 8 x 8 x 4 size. Since this unit utilizes a small number of units per square foot and since the fabrication runs of the size are large their total costs per square foot are usually one of the most reasonable. Another reason to take into consideration this size may be the end, step down, 45 degree angle, and 90 degree corner blocks are for sale in this size as well as in multiple patterns (including Decora, Wave, Icescapes, Iceberg & Clear).
Design Tip # 5- When to utilize 12″ x 12″ x 4″ blocks – The 12″ x 12″ unit can be used primarily for its larger size and mass. This selection is normally employed in glass block window and wall in-fill projects predominately within the commercial market. Common patterns include Decora, Wave, Argus, Vue, and Clear.
Design Tip #6 – Mix up sizes, colors and frosted choices for a unique touch- Why be uniform when you are able come out with a unique type of your individual? Mixing the sizes together provides exactly the touch that can make a project jump out. It is usually easiest to mix blocks like 6″ x 6″ using the 12″ x 12″ units in order to mix 4″ x 8″ blocks with 8″ x 8″ units. Another option to take into consideration may be the utilization of colored or frosted glass blocks – utilize a couple of them as accents, stripes or as being a complete wall or window.
Design Tip #7 – If you’re still not sure call the experts – Sometimes it’s easiest and best to call the block experts to create your shower, window or wall project and take any guesswork out with the process.
Now that you are designed with these sizing tips you need to get up on the glass block shower wall or window project.


