Roll Up Storage Shed Doors
 Mega Storage Sheds Options Roll Up Doors in proportions 3264 X 2448
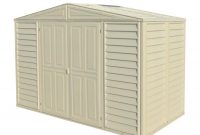
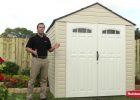
Roll Up Storage Shed Doors – Building a large garden storage shed matches developing a small garden storage shed except it will require more materials and a heck of an much bigger labor. People joke which they do not have enough space to put their “stuff”. Here’s a hard fact. The more room you’ve got, the greater items you gather. If you decide a bigger storage building is necessary think about do is call at your local building department and inquire as to whether a permit is essential for your size building.
A small shed perhaps eight feet by ten feet might require no permit but a bigger one at twenty feet by twenty-five feet may. Ask other questions while your there. Where can the dwelling be on the property? Many municipalities prohibit any type of building in the front yard in any respect. How far from property lines must or not it’s? How tall can or not it’s? Find out these answers now, not after you are finished building it.
Your next stop must be a neighborhood store that handles lumber to ascertain if you can choose from pre-made plans to work with. These can save hours of energy and lots of plan sets provide material lists with them. Plans are offered also on the internet for less than some amount of money. Once your site is selected, cleared and leveled, have the dwelling materials delivered. If the dwelling is usually to sit on wood timbers, it is recommended that a bed of gravel be placed first to help drain away any rain or ground water through the bottom in the flooring timbers. Start by laying out the four corners of the dwelling. Install stakes or batter boards to create the corners. Using string lines layout the beds base timbers along these strings. Typically a large building may have six inch by six inch pressure treated timbers for the beds base. Lay these out according to your plan dimensions for that outside dimensions and also the center to center dimensions in the inside timbers. Install the ground decking next. For moderate to light heavy duty, one layer of three quarter inch tongue and groove CDX plywood is okay. For extra heavy loads, two layers works greater.
Wall framing comes next and although very it is possible to do all of it yourself, a friend or two can save a great many hours of training. Next, layout and nail in position underneath sill plate for many four sides of the dwelling. Cut out any sill plate in the doorway. The fastest method to frame is usually to frame the wall by it lying flat on the ground deck. Frame door and window openings simultaneously.
Next sheath the wall before you stand it up. If using T-111, this allows a finished wall in one shot. Remember to leave the plywood hang down the thickness in the sill plate so after the wall is stood into position, the sheathing could be nailed for the sill. Securely nail the wall for the sill plate and floor timbers. Plumb the wall and install braces to keep it it in position. Now proceed around the dwelling with the rest in the walls. Once these are generally done, the rooftop rafters or trusses come next. For speed, trusses will be the fastest method to go. Two men can erect and nail eleven trusses by 50 % hours easily. That’s a twenty foot shed at twenty-four inch centers. Install all truss bracing shown for the plans, install the required hurricane clips and securely nail everything in position. Double check as you build in order to guarantee that walls are typical plumb and square. Roof sheathing comes next then the selection of roofing material.
Once the rooftop is water tight, turn your awareness of reducing your window and door openings making certain the sheathing is tightly nailed across the perimeter of each one opening. Install windows and doors and basically your storage building is performed. There are thousands of variations of styles for storage buildings from super plain to super fancy. Remember doing it yourself helps you to save lots of money in labor costs by the contractor.
