Wood Deck Framing Plans
 Floating Deck Plans Google Search Deckframing Deck Building in sizing 2954 X 1577
Wood Deck Framing Plans – Wood decks, if left for the ravages of nature, can quickly deteriorate from that clean, shining wood surface you so admired once your deck was not used to a dingy, gray, mildew and dry-rot infested eyesore. If the damage is usually for the deck surface, quick relief is on how while using cleaning and resealing methods I recommend below. Before you begin, though, you need to take a look underneath to be certain dry rot hasn’t found its way in your deck.
Checking for Dry Rot and Making Repairs. Dry rot is a fungus that forms in moisture soaked wood, usually in places shaded from sunlight. Left untreated it’ll spread and destroy the integrity with the timbers, resulting in structural failure. Seek it diligently. It will hide from you in locations that are hard to reach, often underneath the deck where boards and timbers meet. Use a screw driver or similar tool to jab at wood, searching for the tell-tale cardboard-like texture that offers little potential to deal with your probing. Don’t be fooled by painted boards that are sound. Dry-rot can hide behind a layer of paint and stay difficult to notice unless you probe. Badly damaged supporting timbers and deck boards need to be replaced. If the damage just isn’t severe you can chip away the loose wood fibers and apply a fungicide product for example Bora Care or Shell-Guard. Many people report good success with using anti-freeze to help remedy the affected area. If a significant percentage of a timber is damaged, consider removing that part and replacing it having a tight-fitting plug which you epoxy into place. (Follow recommended safety guidelines when working with epoxy.)
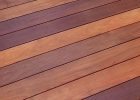
Cleaning the Deck Surface. Even after one particular season new decks, or else properly treated, can lose their original luster and turn a dingy gray. Ultraviolet rays tend to be at fault. Grime, mold and mildew could also detract through the appearance your deck. Before you start work with the particular surface cleaning, make sure your deck has proper drainage. Clean the cracks relating to the surface boards having a pressure nozzle on your own garden hose. (As tempting as it can be, avoid a pressure washer. Even if used judiciously the power with the spray can damage the soft fibers with the wood, giving your deck a grainy and fuzzy appearance.) Where stubborn grime remains in the cracks relating to the boards, make use of a putty knife or saw blade to clear the best way for water to drain. This is especially important near a property where winter snow can trap water and create a pool inches deep.
The next distinctive line of attack is to use an oxalic acid-based wood cleaner for example Wolman DeckBrite Wood Cleaner & Coating Prep or Armstrong’s Wood Cleaner. The oxygen bleach products tend not to contain chlorine and they are stable around plants and animals. The main ingredient is bleach, sometimes inside a liquid solution or even in dry form with soda ash. As the solution soaks in the wood, oxygen ions break up mildew, algae, and dirt.Another approach, if you’re dealing mostly with mildew, would be to you could make your own cleaning solution with 3 quarts water, one quart of oxygen bleach, as well as a quarter cup of liquid dishwasher detergent. Use the ammonia free type. The oxygen bleach will get rid of the mildew as well as the detergent will assist in its removal. After allowing the cleaning strategy to indicate ten to fifteen minutes, scrub with area having a medium-stiff brush, either with a pole just like a push broom or upon hands and knees if you’re just like me so you need to put your muscles in your work. The final step would be to rinse it clean having a garden hose.
Apply a Quality Deck Sealer. Allow your deck to dry prior to deciding to apply any sealer or stain. Then go with a day when you’re confident which you won’t have any rain for one more 24 to two days. You shouldn’t attempt to make use of stains or sealers over existing paint or stain as the sealer is not going to penetrate the wood. You can test this by sprinkling a bit water on your own deck. If the water beads and it is still on the outside after quarter-hour, you simply must return back and take off the present stain. When it comes to choosing a sealant there are many things to consider. Natural oil sealants usually are not recommended as the oils turn deck green or black. Also the natural oils be food for algae and mildew. Most clear sealants is not going to provide much protection against UV ray damage.
Among the most effective option is pigmented sealants since it is the pigments that absorb UV rays and diminish the discoloration so often seen on wood decks. An epoxy sealant, for example DEFY Epoxy Fortified, has chemicals that both deflect light and absorb harmful rays. It is a water based formula that comes in numerous colors for example natural pine, cedar, and redwood. Tinted finishes add color without hiding the natural wood grain, while semi-transparent stains combine color, allowing some with the wood’s grain to exhibit. The semi-transparent stains provide longer protection than tinted finishes. If you have grown fed up with cleaning and handling your wood deck every couple of years, you may well be able to consider another option-paint. A great choice, but tricky to make use of, is a new paint that is a blend of water-based urethane and acrylic resins, for example the Sears Weatherbeater Ultra. The advantage is that the coating lasts for quite some time. Although decks can demand a lot of maintenance to keep them looking sharp, in addition they offer years of enjoyment.


